I recently came across a testing framework called Robot. It allows easy creation of test tables using a simple keyword-driven syntax. The test-cases are stored in simple CSV/TSV files which allow easy creation by even non-technical staff. A really nice feature is a test library for Selenium which may be installed along Robot. This makes testing web GUIs (HTML and according to the docs Flash/Flex) a treat. You may use another library called Ride to maintain, edit and run tests from a nice and simple GUI or you might consider using command line tools to integrate Robot into CI tools.

Installing Robot, Ride and Selenium
This is a description and basic tutorial to install Robot on a Ubuntu machine. To install a web-test setup for Robot do the following:
1. Refer to the following sites and download the latest versions:
Robot Framework
http://code.google.com/p/robotframework/
Ride GUI
http://code.google.com/p/robotframework-ride/
Selenium Plugin
http://code.google.com/p/robotframework-seleniumlibrary/
2. Extract and Copy: Once downloaded, extract and copy all folders to a folder called e.g. /opt/dev/robot
3. Install Robot and all libraries: In each folder run
sudo python setup.py install
4. Start GUI – run the following script to start creating tests:
ride.py
Components in Robot
Tests in Robot are organised in
- Folders containing
- Test Suites containing
- Test Cases, User Keywords, Scalars, List Variables
Keywords are commands used to trigger events. Using Selenium this might be accessing a website, clicking a specific button etc.. User keywords are powerful way to create your own re-usable test commands based on a set of defined keywords. You are allowed to parameterise your user keywords. Great stuff!
Scalars may be understood as variables such as URLs or default parameters passed to web forms e.g.
Setting up a test environment
We now want to create a simple test suite which visits Google.com, searches for Robot Framework and checks if results exist. Before we set up all basic test components we need to define a constant value for the Google URL. To do so, right click on Resources and select New Scalar. Enter ${GOOGLEURL} for name and http://www.google.com as Value.
Creating a Test Suite
Setting up a basic test suite which loads up Google:
1. Click on File -> open Folder, create a new one and give it the name “Google”
2. Right Click on the folder and select “Add Suite”. Give it the Name “Google Test”
3. Right Click on the Suite and create three test cases: Initial, Load Google, Finally
Now, your setup should look something like this:

Loading Resources and Libraries
First we will add the Selenium Library: Click on the Google Test Suite and choose Add Library on the Edit Tab. Here you’ll need to enter the path to the Selenium library. In my case this is
/opt/dev/robot/robotframework-seleniumlibrary-2.7/src/SeleniumLibrary
Then we will add our recently created GOOGLEURL Scalar to the suite. Click Add Resource and enter the path to the constant file. If you do not want to remember and type the whole path, you might want to head back to the constants file, copy the path and paste it in here. Now, we’re ready to create our simple test!
Creating a simple test
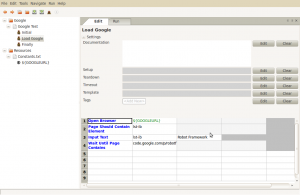
Now, we’re going to create our basic testing. Therefore I’m going to use a number of keywords implemented in the Selenium library. A documentation about these keywords may be found here: http://robotframework-seleniumlibrary.googlecode.com/hg/doc/SeleniumLibrary.html?r=2.7 Of course you may create your own keywords.
1. We need to start the Selinum Server: The keyword to do this is – surprise – Start Selenium Server. Add this to your initial test case.
Start Selenium Server
2. Then we’re going to visit Google in Firefox:
Open Browser ${GOOGLEURL}
3. Let’s wait until the search field is present. The id of the input field is ‘lst-ib’:
Page Should Contain Element lst-ib
According to the Selenium Library Documentation the identifier may be the id of an element, its XPath locator etc.
4. Now fill the field with “Robot Framework”:
Input Text lst-ib Robot Framework
5. Wait for the page to contain “code.google.com/p/robotframework/”
Wait Until Page Contains code.google.com/p/robotframework/
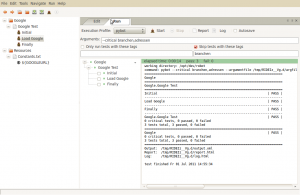
We’re now ready to run the test. To do so, we hit the small brown “run” icon in the tool bar and we’ll see: it works just fine

Enhancements
Robot creates a log and report for each test-run. If a test fails, a screenshot is being created and integrated into the html report. You are, of course, able to trigger the creation of screenshots or source code logging. Also, using the Wait For Condition keywords you are able to run an almost unlimited amount of JavaScript based tests on your website. Have a look at the Selenium docs – there is a huge amount of keywords to be used.
An easy to use testing tool
Robot is a nice and easy to use tool – we’re not using it to integrate into CI. We’re just running stand-alone tests. But it’s really handy when it comes to handle a huge number of test cases: For example we were testing the behaviour of search functionality of one of our websites. With robot I was able to fire hundreds of request against the search and get screenshots in return for further manual investigation. Also we’re using it to autmatically test dependencies of our content trees in huge navigational structures. For this kind of test Robot is perfectly suited.

